Why this blog?
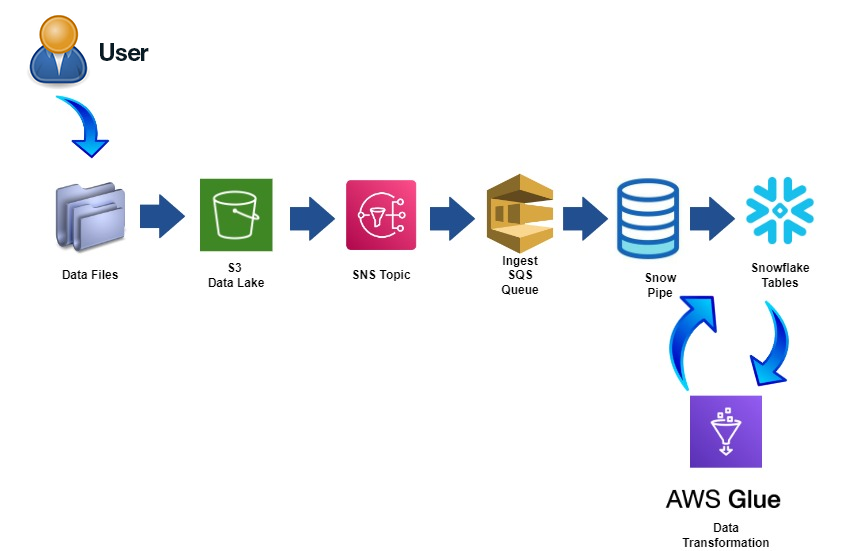
This blog offers a comprehensive guide to setting up a simple ETL pipeline using Snowflake, AWS, and PySpark, facilitating automatic data flow from a data lake to a data warehouse. You will gain insights into integration techniques, AWS setup, data movement strategies, and PySpark data transformation, making it a valuable resource for ETL enthusiasts.
How can we set up an ETL Pipeline Using Snowflake, AWS, and PySpark?

Here is a guide that provides insights into setting up a straightforward ETL pipeline swiftly using various components. It also offers a basic understanding of orchestrating data flow with diverse transformations from a data lake to a data warehouse automatically, utilizing the Covid-19 Dataset.
Here are the prerequisites and components used to prepare the pipeline:
Prerequisites
1.Snowflake Account, please go with the trial version
2.AWS Account, please go with the AWS trial account
3.Please use this link to download Covid-19 dataset
Components
- Data Lake – AWS S3
- Data Warehouse – Snowflake
- Data Transformation – PySpark
- Triggering Events – AWS SNS, Snowflake SQS
Let’s dive into preparing the setup. I assume you already have an account in AWS and Snowflake. Below are the steps, we will be following.
AWS Setup with Snowflake Storage Integration
1. In IAM > Roles > Create New Role > AWS Account (Requires External ID)
Initially proceed with random external id like ‘00000000’
2. Attach policies with full access to S3, SNS and SQS
3. Proceed with default actions and create role
4. Create snowflake Storage Integration Object using following syntax:
create storage integration S3_int

  type = external_stage,

  storage_provider = S3,

  enabled = true,

  storage_aws_role_arn = 'ARN of the new role created',

  storage_allowed_locations = ('Path to S3 Bucket');
5. In S3 > Create Bucket > Provide name and Choose Region and go with the default selected options
Note : Region should be same where snowflake account is created.
6. Update path in above query to storage_allowed_locations like below
Path : S3://{providebucketname}/7. Run ‘DESCRIBE integration S3_INT’
8. Edit Trust Relationships JSON part – AWS arn and External ID from the output
running describe command
{

    "Version": "2012-10-17",

    "Statement": [

        {

            "Effect": "Allow",

            "Principal": {

                "AWS": "Copy STORAGE_AWS_IAM_USER_ARN"

            },

            "Action": "sts:AssumeRole",

            "Condition": {

                "StringEquals": {

                    "sts:ExternalId":  "Copy STORAGE_AWS_EXTERNAL_ID"

                }

            }

        }

    ]

}
9. Update the policy and we are done with the role, bucket and integration setup
AWS SNS Connection to Snowflake
1. In Amazon SNS > Topics > Create Topic > Type FIFO > Provide Name > Default
options
2. Define access policy to Everyone – (Not recommended for trail runs)
3. Keep the copy of the JSON preview handy as we will be updating this JSON to
register events to Snowflake SQS. Finally, click on Create Topic
4. Now in Snowflake run following query and copy statement part of the JSON
and paste it in the last to the JSON we copied from JSON preview of SNS
and update SNS and save
Query - select system$get_aws_sns_iam_policy('PUT ARN of the SNS created');This part of above code output should be pasted to SNS JSON Preview.
{

"Sid":"1","Effect":"Allow","Principal":{"AWS":"XXXXX"},"Action":["sns:Subscribe"],"Resource":["XXXXXXX"]

}
5. Finally, we are done with the setup of setting automatic data flow from S3 to Snowflake by registering events in, while adding file in S3 and sending message to SQS queue to update data in Snowflake
Data Movement Strategy in Snowflake
Initially, historical data will be loaded into both the staging and final tables. Subsequently, any delta data arriving in S3 will be captured by the staging table stream. This captured change will then be utilized by tasks defined within the staging table to automatically update or create records in the final table as necessary. Therefore, to facilitate this data movement, we will create various objects in Snowflake, including databases, tables, file formats, pipes, streams, and tasks.
Snowflake Objects Creation Part – 1
STAGING AND FINAL TABLE OBJECTS IN SNOWFLAKE
——————————————–
1. Create Staging Database to store schemas
Create database ETL_PROJECT_STAGING;2. Create table to store covid-19 staging data
create or replace TABLE ETL_PROJECT_STAGING.PUBLIC.COVID_19 (

SNO NUMBER(38,0) autoincrement,

REPORTEDDATE VARCHAR(100),

STATE VARCHAR(50),

CONFIRMEDINDIANNATIONAL NUMBER(38,0),

CONFIRMEDFOREIGNNATIONAL NUMBER(38,0),

CURED NUMBER(38,0), DEATHS NUMBER(38,0),

CONFIRMED NUMBER(38,0))

COMMENT='This is covid_19 India Data';
3. Create File Format as we will be having csv file which needs to be loaded in table
Create file format ETL_PROJECT_STAGING.PUBLIC.COVID_CSV

type = 'csv',

field_delimiter = ',',

record_delimiter = '\n',

skip_header = 1,

field_optionally_enclosed_by = '\042',null_if = ('\\N');
4. Create an external staging object using S3 Bucket location and storage integration object
create or replace stage covid_s3_stage

storage_integration = S3_INT

url = 's3://snowflakecoviddata/covid_19/'

file_format = ETL_PROJECT_STAGING.PUBLIC.COVID_CSV;
5. Create pipe object to ingest data automatically from S3 to table in snowflake whenever data gets landed to S3
create or replace pipe ETL_PROJECT_STAGING.PUBLIC.s3_to_snowflake_covid_19

auto_ingest = true,

aws_sns_topic = 'arn:aws:sns:us-east-2:681515040523:etl_covid'

as

copy into ETL_PROJECT_STAGING.PUBLIC.COVID_19 from @ETL_PROJECT_STAGING.PUBLIC.covid_s3_stagefile_format = ETL_PROJECT_STAGING.PUBLIC.covid_csv;
6. Validate whether all the objects got created successfully
Show Databases;

Show Schemas;

Show tables;

Show file formats;

Show stages;

Show Pipes;
7. Check snowpipe status using query below. It should be in paused status
Select system$pipe_status('ETL_PROJECT_STAGING.PUBLIC.s3_to_snowflake_covid_19');8. Now resume the pipe status using below query
alter pipe ETL_PROJECT_STAGING.PUBLIC.s3_to_snowflake_covid_19 set pipe_execution_paused = true;9. Create Final Database to store schemas
Create database ETL_PROJECT_FINAL;10. Create table to store covid-19 final data
create or replace TABLE ETL_PROJECT_FINAL.PUBLIC.COVID_19 (

SNO NUMBER(38,0) autoincrement,

REPORTEDDATE VARCHAR(100),

STATE VARCHAR(50),

CONFIRMEDINDIANNATIONAL NUMBER(38,0),

CONFIRMEDFOREIGNNATIONAL NUMBER(38,0),

CURED NUMBER(38,0), DEATHS NUMBER(38,0),

CONFIRMED NUMBER(38,0))

COMMENT='This is covid_19 India Data';
Let’s move forward with the historical data load. This process will be automated; all we need to do is create a folder inside the previously created S3 bucket with the name you provided. Let’s create the ‘Covid-19’ folder and place an initial file with 1000 rows, which we’ll treat as the historical load. Once the file is placed, the data will automatically be loaded into the staging table within a couple of minutes.
Historical Data Format Sample
—————————–
SNO, REPORTEDDATE, STATE, CONFIRMEDINDIANNATIONAL, CONFIRMEDFOREIGNNATIONAL, CURED, DEATHS, CONFIRMED
1,30-01-2020,Kerala,1,0,0,0,1
2,31-01-2020,Kerala,1,0,0,0,1
3,01-02-2020,Kerala,2,0,0,0,2
4,02-02-2020,Kerala,3,0,0,0,3
5,03-02-2020,Kerala,3,0,0,0,3
6,04-02-2020,Kerala,3,0,0,0,3
7,05-02-2020,Kerala,3,0,0,0,3
8,06-02-2020,Kerala,3,0,0,0,3
9,07-02-2020,Kerala,3,0,0,0,3
10,08-02-2020,Kerala,3,0,0,0,3
AWS Data Engineering Essentials Guidebook

Historical Data Load Verification
1. Please verify the data in staging table using below query
Select * from ETL_PROJECT_STAGING.PUBLIC.COVID_19;2. Now move this historical data to final table using below query
Insert into ETL_PROJECT_FINAL.PUBLIC.COVID_19(

SNO,

REPORTEDDATE,

STATE,

CONFIRMEDINDIANNATIONAL,

CONFIRMEDFOREIGNNATIONAL,

CURED,

DEATHS,

CONFIRMED)

Select * from ETL_PROJECT_STAGING.PUBLIC.COVID_19;
3. Please verify the data in final table using below query
Select * from ETL_PROJECT_STAGING.PUBLIC.COVID_19;SnowFlake Objects Creation Part – 2
STAGING AND FINAL TABLE OBJECTS IN SNOWFLAKE
——————————————–
11. Create Stream to capture data change when any delta data gets loaded into
staging table
// Note : Make append_only = true to force system to add or update new records.
Create stream ETL_PROJECT_STAGING.PUBLIC.covid_19_stream on table ETL_PROJECT_STAGING.PUBLIC.COVID_19 append_only = true;
12. Create Task to transfer changes in staging table to final table automatically in the scheduled time i.e. (1 minute). By default, it will be in stopped status
Logic
—–
check fields – Reported Date and State pair
If Reported Date and State pair is not available, then new record creation.
If Reported Date and State pair is available, then update data.
Use below query to prepare task.
//Create or replace task task_covid_19

WAREHOUSE  = compute_wh

SCHEDULE  = '1 MINUTE'

WHEN

SYSTEM$STREAM_HAS_DATA('ETL_PROJECT_STAGING.PUBLIC.covid_19_stream')

As

merge into ETL_PROJECT_FINAL.PUBLIC.COVID_19 cov_final

using ETL_PROJECT_STAGING.PUBLIC.covid_19_stream cov_stg_stream on cov_stg_stream.REPORTEDDATE = cov_final.REPORTEDDATE

and

cov_stg_stream.state = cov_final.state

when matched

then update set

cov_final.CONFIRMEDINDIANNATIONAL = cov_stg_stream.CONFIRMEDINDIANNATIONAL,

cov_final.CONFIRMEDFOREIGNNATIONAL = cov_stg_stream.CONFIRMEDFOREIGNNATIONAL,

cov_final.CURED = cov_stg_stream.CURED,

cov_final.DEATHS = cov_stg_stream.DEATHS,

cov_final.CONFIRMED = cov_stg_stream.CONFIRMED

when not matched

then insert (

REPORTEDDATE,

STATE,

CONFIRMEDINDIANNATIONAL,

CONFIRMEDFOREIGNNATIONAL,

CURED,

DEATHS,

CONFIRMED)

Values(

cov_stg_stream.REPORTEDDATE,

cov_stg_streamcov_stg_stream.STATE,        cov_stg_stream.CONFIRMEDINDIANNATIONAL,        cov_stg_stream.CONFIRMEDFOREIGNNATIONAL,

 cov_stg_stream.CURED,

cov_stg_stream.DEATHS,

cov_stg_stream.CONFIRMED);
13. Resume the task using below query
ALTER TASK IF EXISTS task_covid_19 RESUME;Let’s move forward with the delta data load process. This will occur automatically; all we need to do is place a new file inside the ‘Covid-19’ folder containing the updated rows from the previously loaded records. Below, you’ll find a sample showcasing two updated records. Once this file is uploaded to S3, the data will be automatically loaded into the staging table via SnowPipe, capturing these two updated rows in the stream. Within another minute, the task will be triggered to update these two rows of data in the final table.
Row count of Staging and Final table will be different.
Delta Data Load Sample
SNO,REPORTEDDATE,STATE,CONFIRMEDINDIANNATIONAL,
CONFIRMEDFOREIGNNATIONAL
,CURED,DEATHS,CONFIRMED
1,30-01-2020,Kerala,2,0,1,3,4
2,31-01-2020,Kerala,4,5,1,2,5
Note: Please observe 1st 2 rows data got changed.
Data Transformation Using PySpark on Final Table
Now, we will apply some transformations to the data stored in the final table and store it again in the Snowflake Analytics database. We will utilize AWS Glue to execute PySpark jobs for this purpose. The objective is to store the data in three tables: one for monthly cases, another for quarterly cases, and a third for half-yearly cases, all organized by state for each column.
Schema would look like below:
Tables for storing Analytics Data in Snowflake
———————————————-
Create database ETL_PROJECT_Analytics

Use ETL_PROJECT_Analytics;

Create or replace table monthly_covid_report(

    comonth varchar(15),

    coyear Number,

    state varchar(15),

    confirmedIndianNational Number,

    confirmedForeignNational Number,

    Cured Number,

    Deaths Number,

    Confirmed Number

)

comment = "This table consists of monthly data to track number of people getting covid belongs to india or not as well as number of deaths/cured/confirmed";

Create or replace table quarterly_covid_report(

    coquarter varchar(15),

    coyear Number,

    state varchar(15),

    confirmedIndianNational Number,

    confirmedForeignNational Number,

    Cured Number,

    Deaths Number,

    Confirmed Number

)

comment = "This table consists of quarterly data to track number of people getting covid belongs to india or not as well as number of deaths/cured/confirmed";

Create or replace table half_yearly_covid_report(

    cohalf varchar(15),

    coyear Number,

    state varchar(15),

    confirmedIndianNational Number,

    confirmedForeignNational Number,

    Cured Number,

    Deaths Number,

    Confirmed Number

)

comment = "This table consists of halfyearly data to track number of people getting covid belongs to india or not as well as number of deaths/cured/confirmed";
Verify the table creation using query
Show Tables;AWS Glue Setup for running PySpark Jobs
To run PySpark Jobs, we need dependent Jars Spark Snowflake Connector and Snowflake Driver. Please download the dependent jars from here. We will be making use of this jar from the S3 bucket. So, please go ahead and create an S3 bucket and upload both the Jars as prerequisite.
1. In IAM > Roles > Create New Role > Choose Trusted Entity Type as AWS Service
and select Glue as Use Cases for other service in the bottom of the page
2. Attach policies with full access to S3 and Glue
3. Proceed with default actions and create role. Hence, we are done with creation
of role to call other AWS Services from Glue
4. In AWS Glue > Jobs > Create > Job Details > Provide following details
IAM Role – Newly Created IAM Role above
Glue version – Glue 3.0
Language – Python 3
Worker type – G.1X
Request number of workers – 2
Number of retries – 3
job timeout – 5
5. Click on Save. We are ready to go for scripting in script tab
Data Transformation Script
Please find the Github link below to see the full code and explanation.
Hurray!
We are done with the basic ETL Pipeline setup with real data flowing from S3 to Snowflake with some transformations in PySpark.
What have we covered here?
- Establishing a connection between AWS SNS and Snowflake SQS
- Understanding the roles of Snowflake streams and tasks within your workflow
- Integrating PySpark and Snowflake using AWS Glue and dependent JARs.
- How to automate data transfer from S3 to Snowflake using Snowpipe with auto_ingest feature which works best with storage integration?


